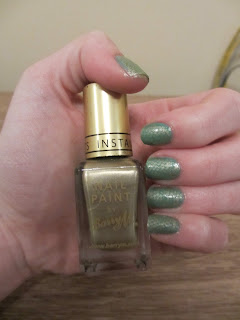
Day 13 of 31 day challenge: Animal Print
For today challenge i wanted to try something different from the usual leopard or zebra print .
So i thought i would give a snake print a try.
This is the first attempt so let see how it goes...
For this tutorial you will need:
-Top and base nail varnish
- Base colour nail varnish
- Contrast colour nail varnish
- Make up/ cosmetic sponge
- Netting
First off undercoat your nails with your base nail varnish.
Once dry apply your base colour
I am using Barry M spring green.
Take your netting and wrap it tightly over your nail.
Paint on the contrast nail varnish on to the sponge.
Lightly dab over the top of the netting.
I am using Barry m Gold instant effect.
Allow to dry for a couple of seconds and remove the netting.
This will give you a textured look like scales.
I think i should have used netting with larger wholes.
Finish with a top coat to give it a slimy snake skin like look.
I will purchase some larger netting and give it another go.
Look out for my post coming soon.
Katie


I really like this look Katie :) where did you get the netting?
ReplyDeleteGC xo
http://somethingkindacloughton.blogspot.co.uk/
Thank You - Glad you like it.
ReplyDeleteI raked all over and found it on an old halloween costume so it's recycled material :)
When i hunt for the next lot i will get it from the local craft shop or possibly try a fishing shop.
Katie